
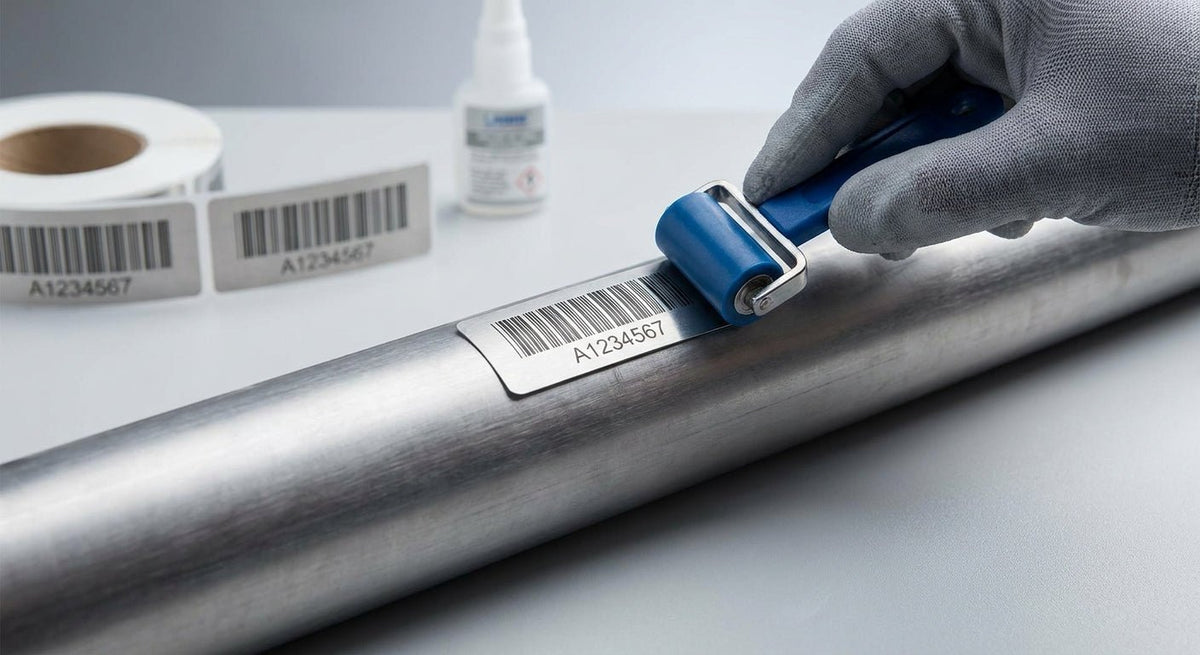
Applying metallic asset tags to curved surfaces is a 5-step process that determines whether your tags survive 5 years on a pipe or peel off in a week — and the difference comes down to surface prep, tag material, and application technique.
TL;DR: To apply asset tags to curved surfaces in 2026, clean the surface with IPA, choose a metallized silver polyester tag with 3M-grade adhesive rated for curved substrates, pre-curve the tag before peeling the liner, apply from center outward with firm thumb pressure, and let it dwell under pressure for 72 hours. Tags with inadequate adhesive fail within 30 days on diameters under 2 inches. McAuley Labels' asset tags for equipment are specifically formulated for this use case.
Why This Matters
Curved surfaces — pipes, cylinders, conduit, tanks, tool handles, compressed-gas bottles — are the most common asset-tagging failures in warehouses and manufacturing plants. A flat-cut label applied cold to a 1.5-inch pipe will start edge-lifting within days. Metalized silver polyester is more rigid than paper, which makes the geometry problem worse if you skip the prep steps below. Get this right once and the tag survives solvents, UV, and temperature cycles.
What You'll Need
- Metallized silver polyester asset tags with pressure-sensitive 3M-grade adhesive (minimum 3M 467MP or equivalent)
- 70% isopropyl alcohol (IPA) wipes — not shop rags soaked in WD-40
- Clean lint-free cloths or kimwipes
- Hard rubber brayer or bone folder (a credit card works for diameters over 3 inches)
- Thermometer if working in an environment under 50°F
- Pencil or dowel rod sized to match the curved surface diameter
- Masking tape (for pre-curving)
- Timer — 72-hour dwell period starts after application
For printing your tags before application, a 300 DPI or 600 DPI thermal transfer printer handles metallized silver stock cleanly. The GoDEX RT863i thermal printer at 600 DPI produces barcodes and sequential numbering at the resolution needed for small asset tags without bleed.
The Steps
Step 1: Verify Your Tag Adhesive Is Rated for Curved Substrates
Before you touch the surface, confirm the adhesive spec on your tags. A standard permanent acrylic adhesive requires a minimum 1-inch bend radius — anything tighter and it will shear. Metallized silver polyester tags with 3M 300LSE or 467MP adhesive handle radii down to 0.5 inches. If your tags shipped without an adhesive spec sheet, apply one test tag to a scrap piece of pipe with the same diameter, wait 24 hours, then try to lift an edge with a fingernail. If it lifts, the adhesive grade is wrong for that surface.
Expected outcome: You have a confirmed adhesive grade before committing a full batch. Common mistake: Assuming all "permanent" labels handle curves — standard permanent adhesive on a 1-inch pipe will fail within 2 weeks.
Step 2: Prep the Surface — No Shortcuts
Surface contamination is the single largest cause of label failure on metal. Wipe the target area with a fresh IPA wipe and let it flash dry for 30 seconds — do not blow on it. On powder-coated steel or painted surfaces, check for loose paint; any flaking means the tag will pull the coating off, not bond to the substrate. On bare metal or chrome, a second IPA pass is worth the 10 seconds.
Temperature matters: adhesive application below 50°F (10°C) reduces initial bond strength by up to 40%. If your facility runs cold, warm the surface to at least 60°F with a heat gun on low before applying — 15 seconds of light heat is enough. Common mistake: Wiping the surface with a glove that has machine oil or silicone on it — you've just re-contaminated what you cleaned.
Step 3: Pre-Curve the Tag
This is the step most applicators skip in 2026, and it accounts for the majority of edge-lift failures. Place the tag face-down on a clean surface. Using a pencil or dowel that matches the diameter of the pipe or cylinder, gently roll the tag around it — adhesive liner still on — applying light thumb pressure for about 10 seconds. The goal is to pre-stress the tag into the approximate curvature of the surface before the adhesive makes contact.
For diameters under 1.5 inches, do two passes. The tag should hold a curve on its own when you set it down. Expected outcome: When you peel the liner and apply the tag, the edges already want to conform to the surface rather than spring away. Common mistake: Pre-curving too aggressively on a small-diameter dowel, which can crack the metalized coating on thinner polyester stock — match the dowel to the actual surface diameter.
Step 4: Apply Center-Outward with Firm Pressure
Peel back roughly one-third of the liner from one end. Position the exposed adhesive at the center of the curved surface — not at an edge. Press the center down firmly with your thumb, then slowly peel the remaining liner while pressing outward toward both ends simultaneously. Use a hard rubber brayer or the edge of a credit card to burnish the tag, working from center to each end in short strokes.
Apply a minimum of 15 lbs of pressure across the full tag surface — that is firm, sustained thumb-plus-brayer pressure, not a light pass. On very small-diameter surfaces (under 1 inch), wrap the tag and use masking tape to hold it under compression for the first 2 hours while the adhesive flows into the surface texture. Expected outcome: No air pockets, no edge lift visible immediately after application. Common mistake: Starting the application at one end and peeling across — this traps air and creates a bubble line that permanently weakens adhesion.
Step 5: Enforce the 72-Hour Dwell Period
Pressure-sensitive adhesive does not reach full bond strength on contact — it cold-flows into surface micro-texture over time. On curved metal surfaces, full bond strength on 3M 300LSE adhesive is reached at approximately 72 hours at room temperature (70°F). Do not expose the tag to solvents, high-pressure wash, or sustained vibration during this window.
If the tagged asset goes back into service immediately and gets hit with coolant or solvent within the first 24 hours, the adhesive has not fully set and edge-lift is likely. Mark the tag or the work order with the application date. Expected outcome: After 72 hours, the tag is bonded to the curve and the edges show no lift. Common mistake: Running a wash-down cycle on freshly tagged equipment the same day — schedule tagging after the last wash cycle of the shift.
Troubleshooting
Edge lift on both ends after 48 hours The tag was not pre-curved to match the surface radius, or surface temperature was below 50°F at application. Clean the surface again with IPA, pre-curve a new tag more aggressively, and re-apply with sustained pressure plus tape compression for 2 hours.
Barcode scannable but tag bubbles in the middle Air was trapped during liner peel — the application started at one end instead of the center. The tag will continue to delaminate. Replace it using the center-outward method.
Tag peels off cleanly, leaving no residue The surface had silicone, oil, or wax contamination that IPA did not cut. Use acetone on metal (test a small area first on coated surfaces), let it fully flash dry, then re-apply.
Metalized coating cracks along the curve The tag stock is too rigid for the bend radius, or you pre-curved over too small a dowel. Switch to a flexible metallized polyester grade or increase the tag size so the bend radius per unit length is lower.
Tag adheres but barcode won't scan after 30 days The curved application caused the tag to distort the barcode geometry. Verify the barcode was printed on a 300 DPI or 600 DPI thermal transfer printer — direct thermal on metallized silver produces lower-contrast output that degrades faster. See the thermal label printer for asset tags and barcodes guide for printer spec recommendations.
Tag survives wash-down but adhesive turns white at edges This is adhesive blush from water intrusion before full cure. It indicates the tag was exposed to liquid within the first 72-hour dwell period. The bond is compromised — replace the tag and enforce the dwell window.
Tools and Resources
- Metallized silver polyester asset tags with 3M adhesive: Asset tags for equipment — metallized silver barcode label — the spec McAuley Labels ships for industrial curved-surface applications in 2026
- 600 DPI thermal transfer printer: GoDEX RT863i at mcauleylabels.com — prints sequential barcodes and numbering on metalized stock at the resolution required for small tags
- IPA wipes: 70% isopropyl, pre-saturated — available at any industrial supply; do not substitute hand sanitizer (glycerin content contaminates the surface)
- Hard rubber brayer: 4-inch width handles most pipe and cylinder diameters; a standard credit card substitutes on surfaces over 3 inches in diameter
- Pencil or dowel set: Match diameter to the smallest surface you're tagging; a set of 0.5", 1", and 1.5" dowels covers 90% of industrial pipe sizes
What to Do Next
If you're tagging multiple assets across a facility in 2026, the application process is only half the system — how you design and number the tags for barcode scanning is the other half. The guide on how to label equipment for asset tracking covers sequential numbering schemes, barcode symbology selection (Code 128 vs. QR), and print spec requirements for durable field scans.
FAQ
What's the best adhesive for asset tags on curved metal surfaces? 3M 300LSE and 3M 467MP are the two adhesives that handle radii down to 0.5 inches reliably. Standard permanent acrylic adhesive requires at least a 1-inch bend radius and fails faster on small-diameter pipe.
Can you apply metallic asset tags to a round pipe? Yes — but you must pre-curve the tag to match the pipe diameter before peeling the liner. Skipping pre-curving is the primary cause of edge-lift failure on round surfaces.
How long does it take for an asset tag adhesive to fully bond on metal? Full bond strength on pressure-sensitive 3M adhesive on metal is reached at approximately 72 hours at 70°F. Initial handling strength is achieved within 20 minutes, but the tag should not contact solvents or high-pressure wash before 72 hours.
What temperature do you need to apply asset tags? Minimum application temperature is 50°F (10°C). Below that, adhesive flow is reduced by up to 40% and initial bond strength is significantly lower. Warm the surface to at least 60°F before applying in cold environments.
Is metallized silver polyester better than paper for curved surfaces? For durability, yes — metallized silver polyester resists solvents, moisture, and abrasion that destroy paper labels within weeks. The trade-off is that polyester is more rigid, which makes pre-curving more important than it is with paper stock.
Will an asset tag stick to a painted surface? Yes, if the paint is intact and clean. Loose, flaking, or powder-coated surfaces that are chalking will cause the tag to pull the coating rather than bond to the substrate. Test one tag on a representative area before applying a full batch.
How do you prevent asset tags from peeling on outdoor curved equipment? Use metalized silver polyester with 3M-grade adhesive, enforce the 72-hour dwell period before outdoor exposure, and apply in temperatures above 50°F. Exposure to UV and temperature cycling before full cure is the most common cause of premature outdoor failure.
What size asset tag works best on small-diameter pipes? For pipes under 1 inch in diameter, a 0.75" x 1.5" tag size keeps the circumferential wrap under 180 degrees, which eliminates the geometry problem that causes full-wrap tags to spring off. Larger tags on small pipes need tape-compression during the dwell period.
One Last Thing
The 72-hour dwell rule applies even when the adhesive "feels stuck" at 2 hours. On curved metal, the adhesive is still cold-flowing into micro-texture — the bond at 2 hours is roughly 60% of final strength. In 2026, the most common asset tag failure report in manufacturing facilities traces back to same-day wash-down or solvent exposure, not to the wrong tag material. Protect the dwell window and the tag does its job for years.