
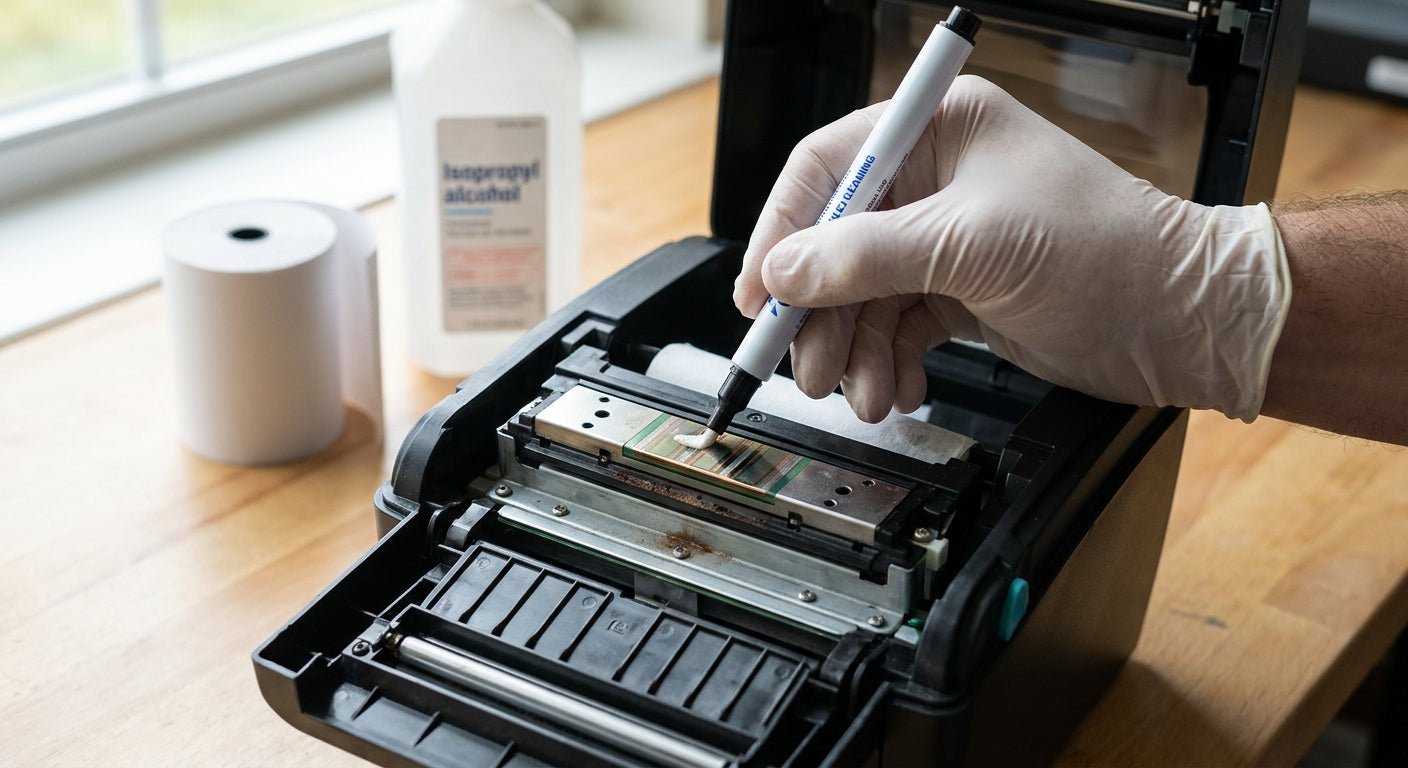
A dirty thermal printhead is the most common reason a GoDEX or other thermal printer starts producing streaky barcodes, faded oil change stickers, or asset tags a scanner can't read — cleaning it takes under five minutes with a $3 alcohol swab and no special tools.
- Knowing how to clean a thermal printhead fixes most streaky-print problems on GoDEX printers in 2026 — a 90%+ isopropyl swab is the standard tool.
- Clean the head every 1-2 ribbon rolls or roughly every 500 feet of labels; skip it longer and print quality drops fast.
- Never use tap water, acetone, or cotton balls on a printhead — cotton sheds fibers that scratch the element. Buy isopropyl-only cleaning pens instead.
- Vertical white streaks mean a dirty or damaged head; horizontal fading usually means the darkness setting is too low, not a dirty head.
- Replace the printhead, don't keep re-cleaning, if streaks persist after three clean-and-test cycles.
Why this matters
Adhesive residue, ribbon wax, and paper dust bake onto the printhead every time a label passes under it. Once that film builds up, heat transfer to the ribbon gets uneven and you get streaky or faded thermal prints that scanners reject at the register or the loading dock.
A barcode that won't scan on an asset tag means someone re-tags the equipment by hand. A faded oil change sticker means a customer misses their next service date. Printhead cleaning is routine maintenance on a GoDEX thermal printer, not a repair — treat it like changing wiper blades, not fixing a transmission.
What you'll need
- 90%+ isopropyl alcohol (swabs, pens, or a small bottle with lint-free cloth)
- Lint-free foam swabs — never cotton balls or cotton swabs, they shed fibers that scratch the head
- Compressed air or a soft brush for dust and label backing debris
- A roll of test labels and a fresh thermal transfer ribbon if the current one is worn or wrinkled
- Nitrile gloves, optional but useful since printhead oils from bare skin also degrade print quality
The steps
1. Power down and let the head cool
Unplug the printer before opening the cover — never clean a head that's still warm from a print run. This protects both you and the resistive elements in the head from thermal shock. Skipping this step is the single most common way people crack a printhead during "quick" cleaning.
2. Open the printhead assembly and remove media
Lift the printhead release lever, pull out the ribbon, and remove the label roll. You need a completely clear path to the head strip — trying to clean around loaded media just pushes debris deeper into the mechanism.
3. Wipe the head strip in one direction
Run the alcohol swab along the printhead's ceramic strip in a single pass, not back and forth. Back-and-forth wiping just redeposits the residue you're trying to remove. Expect the swab to come away visibly gray or brown on a head that hasn't been cleaned in a while — that discoloration is the adhesive and wax film causing your print quality problem.
4. Clean the platen roller
Wipe the black rubber roller beneath the head with the same alcohol swab, rotating it by hand as you go. A glazed or sticky platen roller causes labels to skew or slip, which reads as a printhead problem but isn't one.
5. Clean the label gap sensor
Use a dry cotton swab or compressed air on the small sensor near the media path — this is a different part from the printhead and alcohol isn't necessary here, just dust removal. A dirty sensor causes labels to print blank or skip, which technicians often misdiagnose as a head fault.
6. Let it dry fully before reloading
Give the alcohol 60 seconds to evaporate completely before reloading ribbon and labels. Closing the head on wet alcohol dilutes the cleaning and can leave streaking on the first several labels.
7. Run a test label and inspect
Reload media, close the head, and print a solid black test pattern or a barcode you know is scannable. Check for full-width coverage with no vertical white lines. If the barcode scans clean on the first try, you're done — if not, repeat the alcohol pass once before assuming a hardware fault.
“A swab that comes away gray after the first pass tells you the printhead should have been cleaned two ribbon rolls ago.”
Troubleshooting
Streaks persist after cleaning. A vertical white line that survives three clean-and-test cycles usually means a burned-out or physically damaged head element, not residue — that's a hardware issue, not a cleaning issue.
Print looks faded, not streaky, even on a clean head. This is almost always a darkness/heat setting that's too low for the label stock, not a dirty printhead. Bump the darkness setting up in small increments and reprint before you reach for the alcohol again.
Labels feed crooked after cleaning. The platen roller wasn't seated back into its mount correctly, or it needs its own cleaning pass — recheck it before blaming the head.
Ribbon wrinkles going through the printhead. This points to tension or alignment, not cleanliness. Running the printer with a wrinkled ribbon accelerates head wear, so fix the tension before you print another label.
Alignment drifted since the last cleaning. Reseating a printhead after cleaning can shift alignment slightly on some models. Run through the steps in the guide on how to calibrate a thermal label printer if labels print off-center after reassembly.
Sensor errors after cleaning. If the printer throws a "no media" or "no ribbon" error post-cleaning, the gap sensor likely got bumped or still has residue on it — a second dry pass with compressed air usually clears it.


Tools and resources
- 90%+ isopropyl alcohol swabs or dedicated printhead cleaning pens
- Lint-free foam swabs, replaced often — a contaminated swab just moves residue around
- Compressed air for the sensor and media path
- A backup ribbon on hand, since a worn one accelerates the buildup you're trying to prevent
- The GoDEX label printer troubleshooting resource if cleaning doesn't resolve a print-quality complaint
McAuley Labels sells GoDEX thermal printers and ribbon built around this exact maintenance cycle — a printhead that's cleaned on schedule outlasts one that's cleaned only after a customer complains about an unreadable barcode.
What to do next
If cleaning fixes the print for a week and then the same streak comes back, the head is likely near end of life rather than dirty again that fast. Cross-check symptoms against the full GoDEX printer troubleshooting guide before ordering a replacement head or printer — most 2026-era GoDEX units carry a 3-year warranty, so check that before paying for a part.
FAQ
How often should you clean a thermal printhead?
Clean a thermal printhead every 1-2 ribbon rolls, or roughly every 500 feet of labels printed. High-volume shops printing daily oil change stickers or asset tags should check the head weekly even between scheduled cleanings.
What alcohol percentage do you need to clean a thermal printhead?
Use isopropyl alcohol at 90% concentration or higher. Lower concentrations like 70% rubbing alcohol contain more water, which can leave residue and slow evaporation before you reload media.
Can you use a cotton swab to clean a thermal printhead?
No — cotton swabs and cotton balls shed fibers that stick to the head and scratch the ceramic strip. Use lint-free foam swabs or a dedicated printhead cleaning pen instead.
Why does my printer still streak after cleaning the printhead?
Streaks that survive three clean-and-test cycles usually mean a burned-out head element, not leftover residue. That's a hardware replacement, not a cleaning fix.
Is faded printing always a dirty printhead problem?
No. Faded print with no streaking is usually a darkness or heat setting that's too low for the label stock, not a dirty head. Check the darkness setting before you assume the head needs cleaning.
Does cleaning the printhead fix crooked or skewed labels?
Not directly — skewed feeding is almost always a platen roller or sensor issue, not the printhead. Clean the roller in the same session since it sits right beneath the head.
How much does it cost to clean a thermal printhead?
Cleaning costs a few dollars in isopropyl alcohol and foam swabs, since no tools or replacement parts are needed. A printhead replacement, by contrast, runs into real money, which is why routine cleaning pays for itself.
Can you damage a printhead by cleaning it wrong?
Yes — cleaning a head while it's still hot, using cotton swabs, or scrubbing back-and-forth instead of one direction can all cause damage. Follow a single-direction wipe with a cooled-down head and lint-free materials.
One last thing
The gray or brown film on your swab after the first cleaning pass is the actual cause of most "my printer suddenly got worse" complaints — it's not a printer getting old, it's adhesive and ribbon wax that had months to bake onto the head. Shops that put printhead cleaning on the same schedule as ribbon changes rarely see a streaking complaint at all in 2026, because the two consumables run out at roughly the same rate.